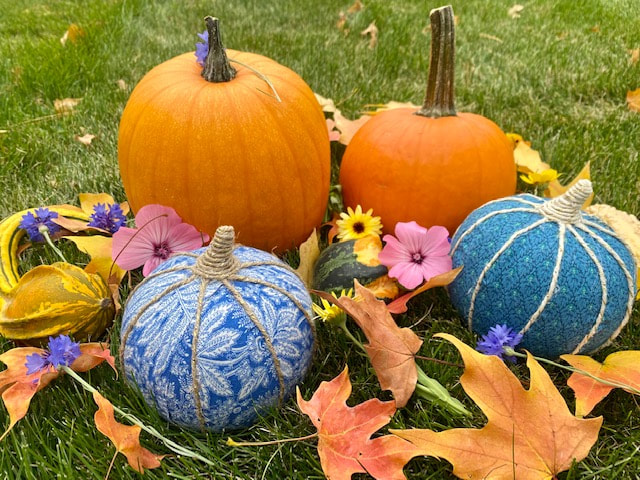
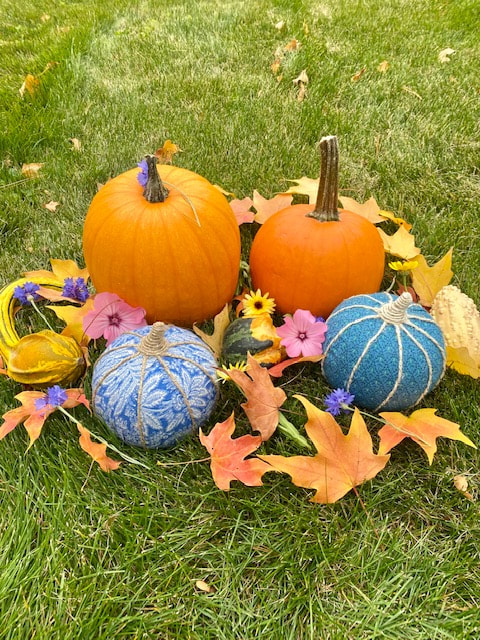
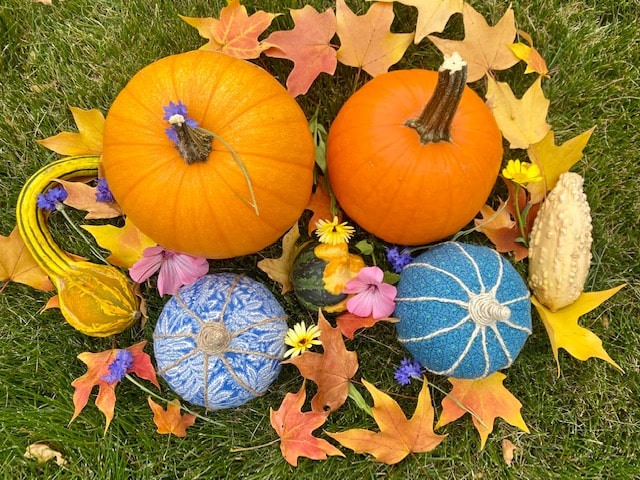
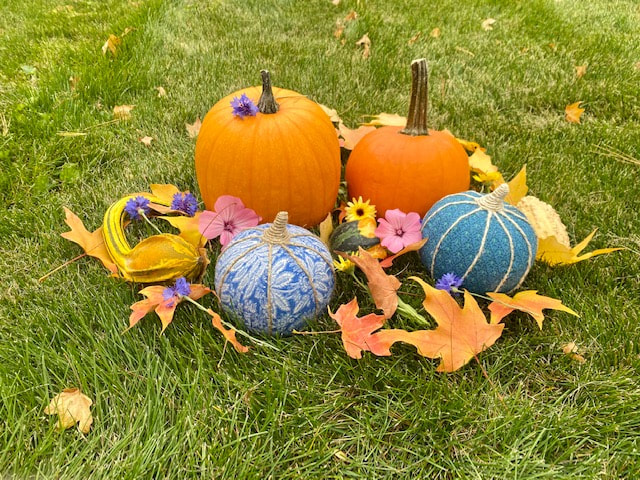
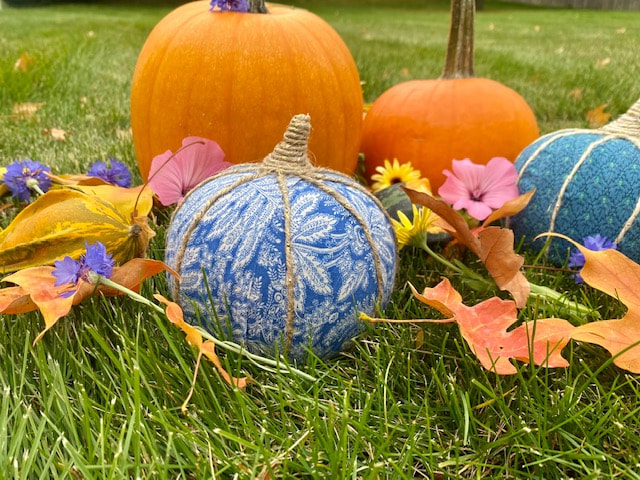
 Transform scraps of cute fabric that you can’t bear to part with to pumpkin spice up your life! In a busy season full of hayrides, apple picking, and costume parties, get your pumpkin fix in a flash with this speedy craft. To make this project, you’ll need:
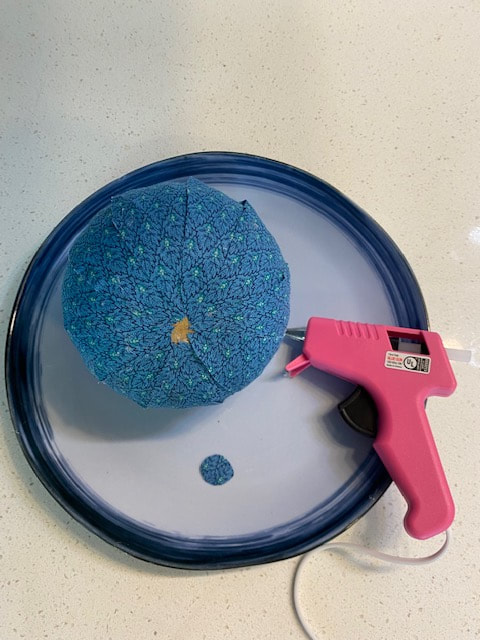
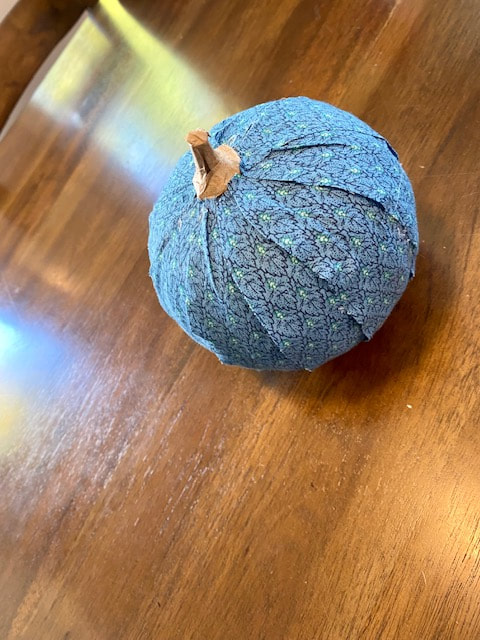
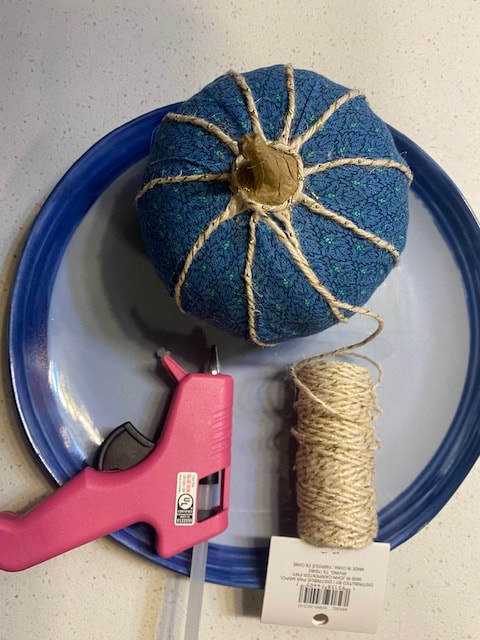
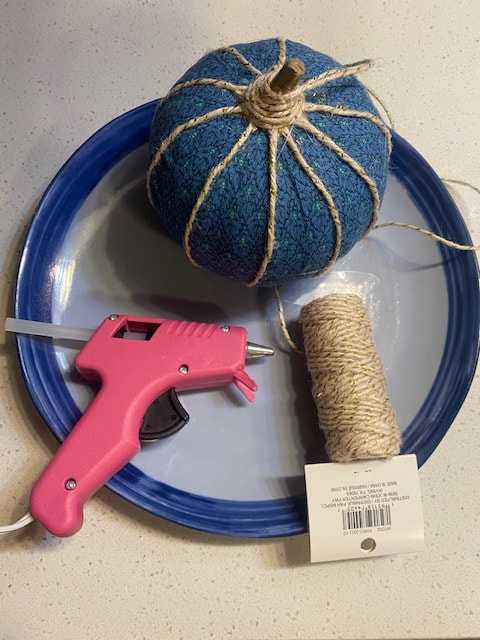
1. Create a teardrop-shaped template that is about the same width (2”) and length (6.5”) as a segment of the crafting pumpkin. 2. Iron the fabric you’ll use to decorate the pumpkin. Pin the template to the fabric and cut 12 pieces of fabric to cover the pumpkin.  3. One segment at a time, attach the fabric to the crafting pumpkin with a thin layer of hot glue. For each segment, start by gluing the fabric at the bottom of the pumpkin and work your way up to the stem. Trim any excess fabric near the stem. Slightly overlap each piece of fabric to avoid gaps. 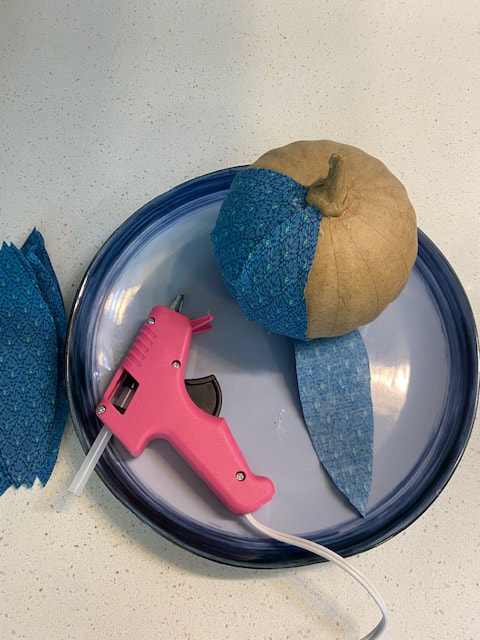 4. Cover the gap at the bottom of the pumpkin with a small circle of fabric. Do the same thing with any other gaps. 5. Use sequin pins to secure twine in a contrasting color to the raw edges of the segments of fabric. 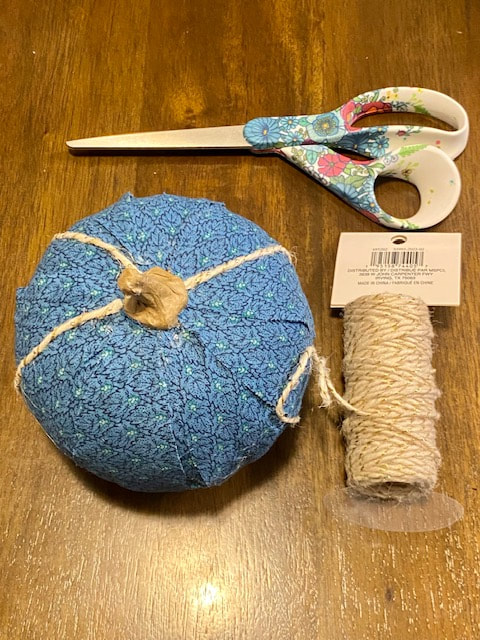 6. Pin twine at the base of the pumpkin’s stem. Continuing upward, use hot glue to secure the twine as you wrap the rest of the stem with it. Enjoy your pumpkin! Create just one or make an entire pumpkin patch. Try using vintage hankies or a variety of printed fabrics on the same pumpkin. Have a wonderful, creative fall!
0 Comments
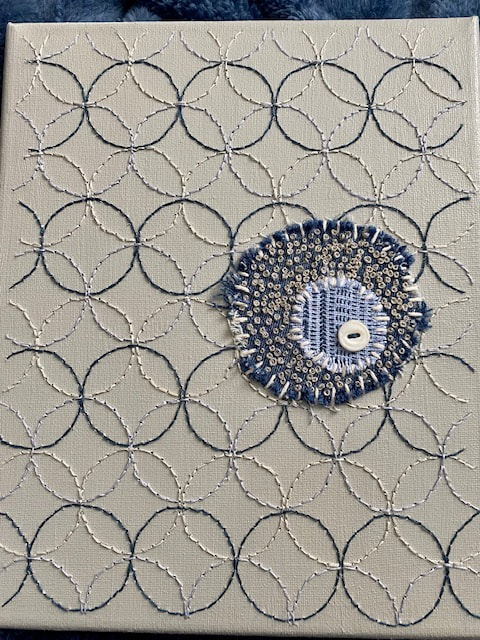
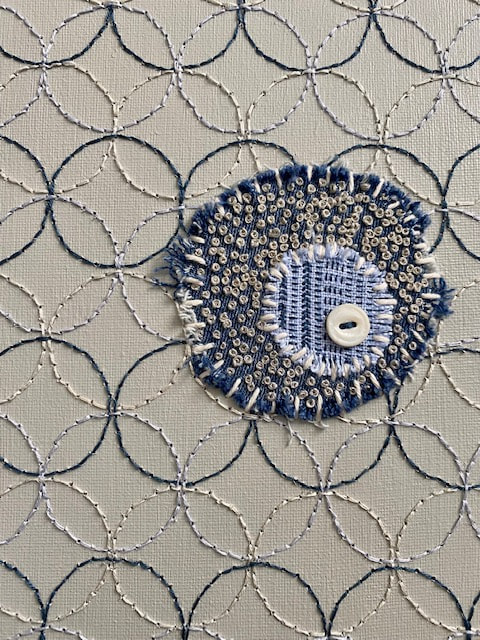
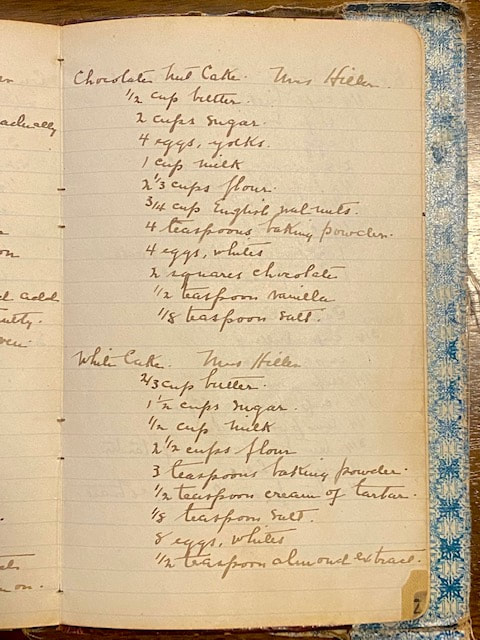
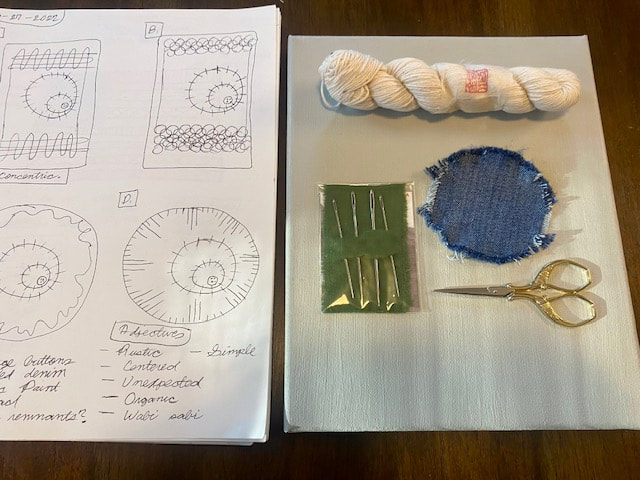
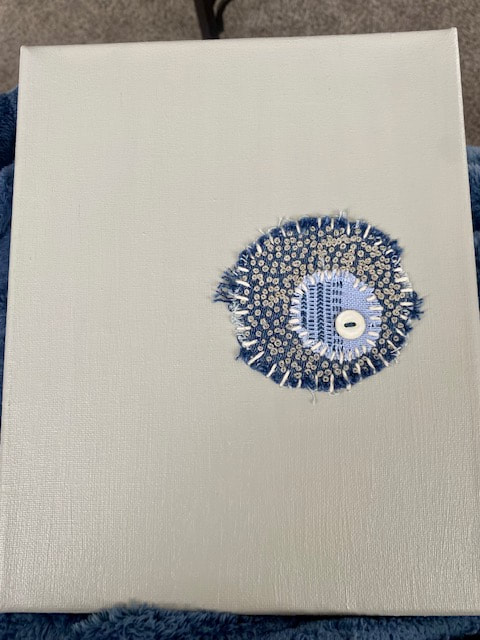
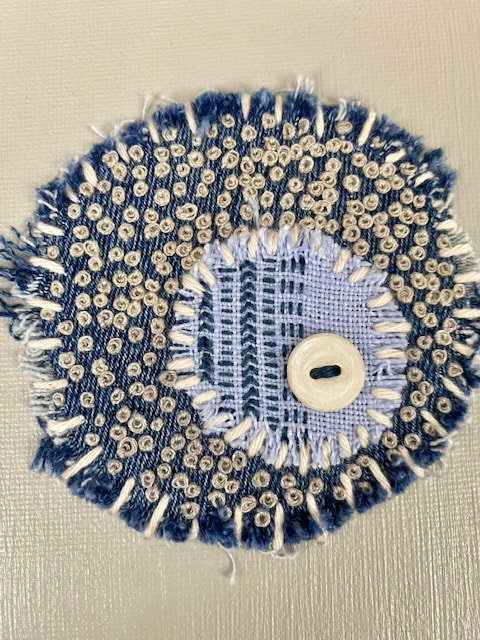
Baking is one of the best ways to welcome cooler weather. Bismarck cookies are citrusy like summer, spicy like fall, and sweet like life! Are Bismarck cookies a tribute to a political figure, a city in North Dakota, or a family? We’ll never know. This recipe can’t be found with a Google search, but if Mrs. Williams included it in her recipe book, it had to be good! 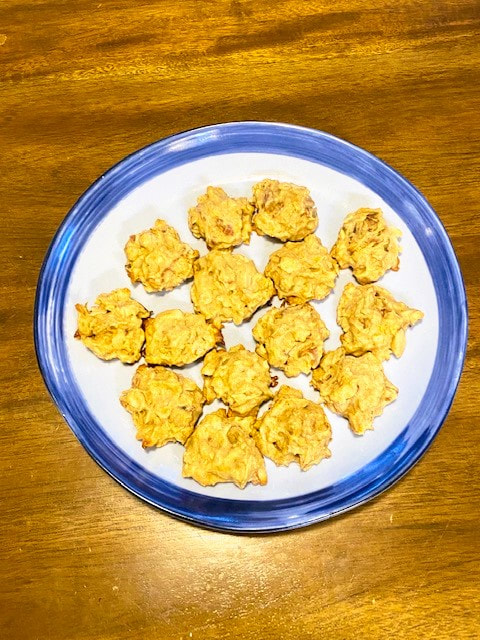 To make Bismarck cookies, you’ll need: - 2 eggs - 1/3 teaspoon cloves - 1/2 cup powdered sugar - 1 tablespoon orange peel, cut finely - 3/4 cups flour - 1/3 teaspoon salt - 1/2 lemon rind, grated - 1/3 teaspoon cinnamon - 3/4 cups slivered almonds 1. Preheat the oven to 350 °F. Grease a cookie sheet. 2. First, whisk together the dry ingredients. Then, mix in the wet ingredients. Finally, add the slivered almonds. 3. Drop dough onto the baking sheet by the spoonful. 4. Bake the cookies for 12 to 13 minutes or until they are slightly browned. 5. Remove the cookies from the oven and allow them to cool. It’s cookie time! 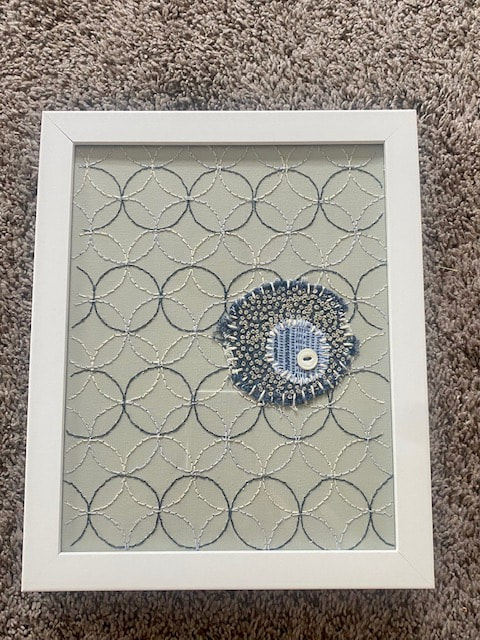 Concentric features upcycled denim and linen and a vintage mother-of-pearl button. The circular motif represents living an eco-friendly lifecycle by reducing, reusing, and recycling. The overlapping of some spheres and the ripple effect of others alludes to the power of our social circles to circulate new ideas and inspire change. This piece was created on a canvas painted with acrylic paint and embellished with pre-loved, distressed textiles and straight stitch, backstitch, and French knots. 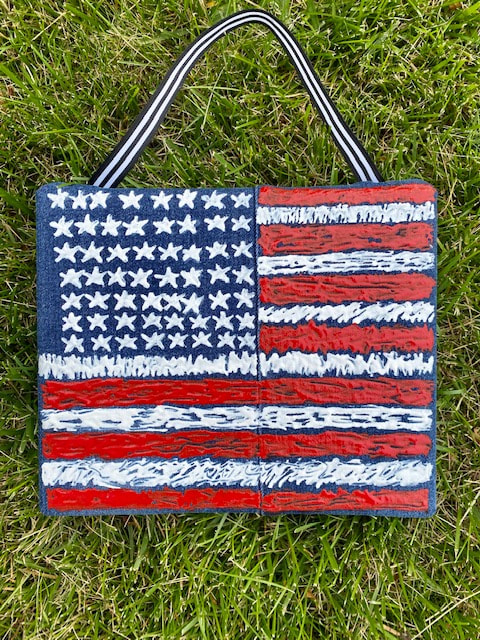 Do over some pre-loved denim to make a patriotic sign decked out with stars and stripes that will take you from Memorial Day to Labor Day! To make this project, you’ll need:
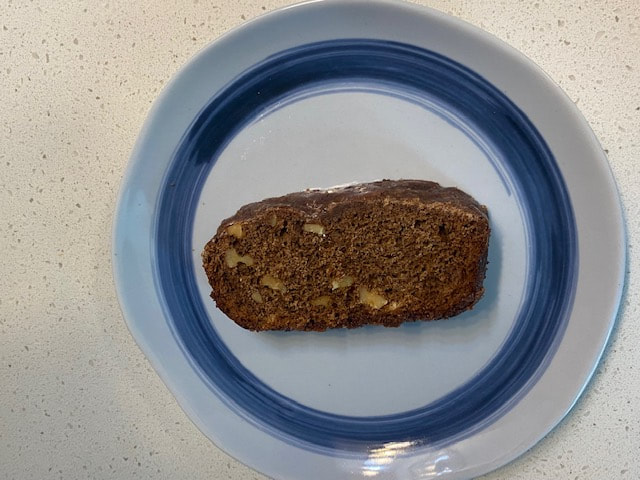
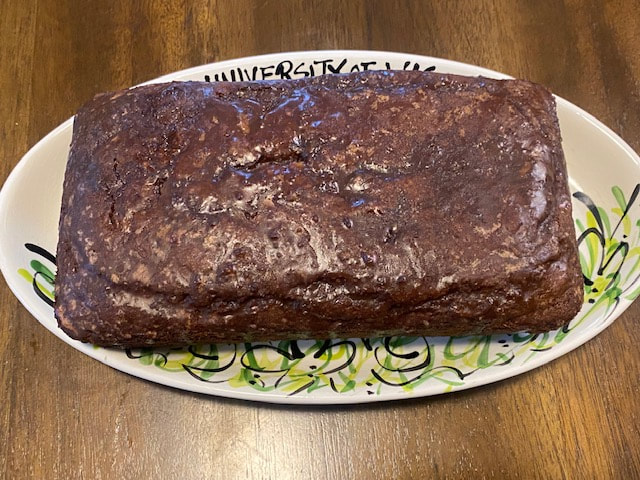
 1. Stretch a piece of pre-loved denim over an 8” by 10” canvas. Click here to view a past blog post with step-by-step instructions on how to do so.  2. In the top left quarter of the canvas, add stars with the white Tulip Slick Dimensional Fabric Paint. Allow the paint to dry for at least 4 hours before continuing to the next step. 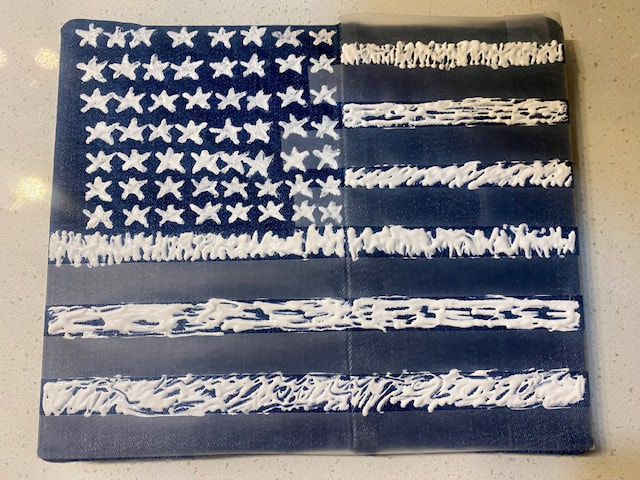 3. Use pieces of Scotch tape to cover where the red stripes will appear on the flag sign. In the open space, draw stripes that still let some of the denim show through with the white Tulip Slick Dimensional Fabric Paint. Allow the paint to dry for at least 4 hours before continuing to the next step. 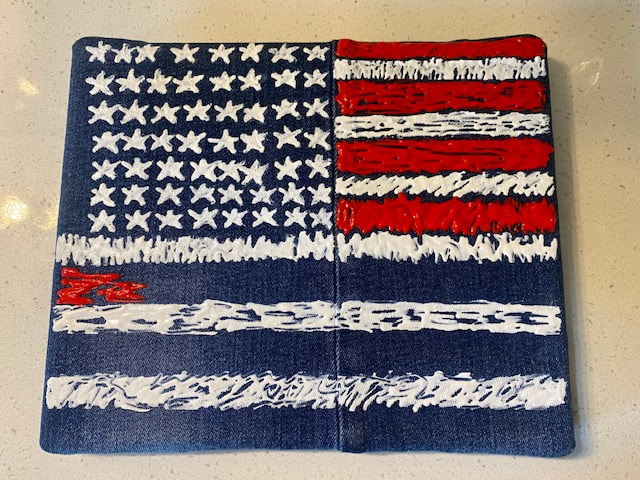 4. Remove the Scotch tape from the denim. Draw the remaining stripes with Tulip Slick Dimensional Fabric Paint in deep red. Allow the paint to dry for at least 4 hours before continuing to the next step. 5. To create a hanger for the sign, cut a 15” length of 5/8” ribbon and staple it to the upper corners of the reverse side of the canvas. Have a fun, safe Fourth of July, friends! Think outside the box! The only thing that’s easier than making this decadent cake from scratch is eating it! To make chocolate nut cake, you’ll need:
To make chocolate glaze, you’ll need:
Hands-down, I delight in destroying and transforming denim much more than I enjoy wearing it! When my jeans are on their last legs, that means the best is yet to come. My interest in sustainability began in my college years. For a time, I was a janitor. I cleaned up messes that words don’t suffice to describe, wrangled with trash bags, and hauled away recyclables. At some point, my inner dialogue shifted from a stream of complaints to a realization that I was living in a laboratory with an opportunity to make observations about habits and attitudes related to consumption and waste. What stays with me to the present is the magnitude of waste that accumulated every day and my shock at how we waste resources without giving it a second thought. My least favorite job was an eye opener and a part of why I’m upcycling today.
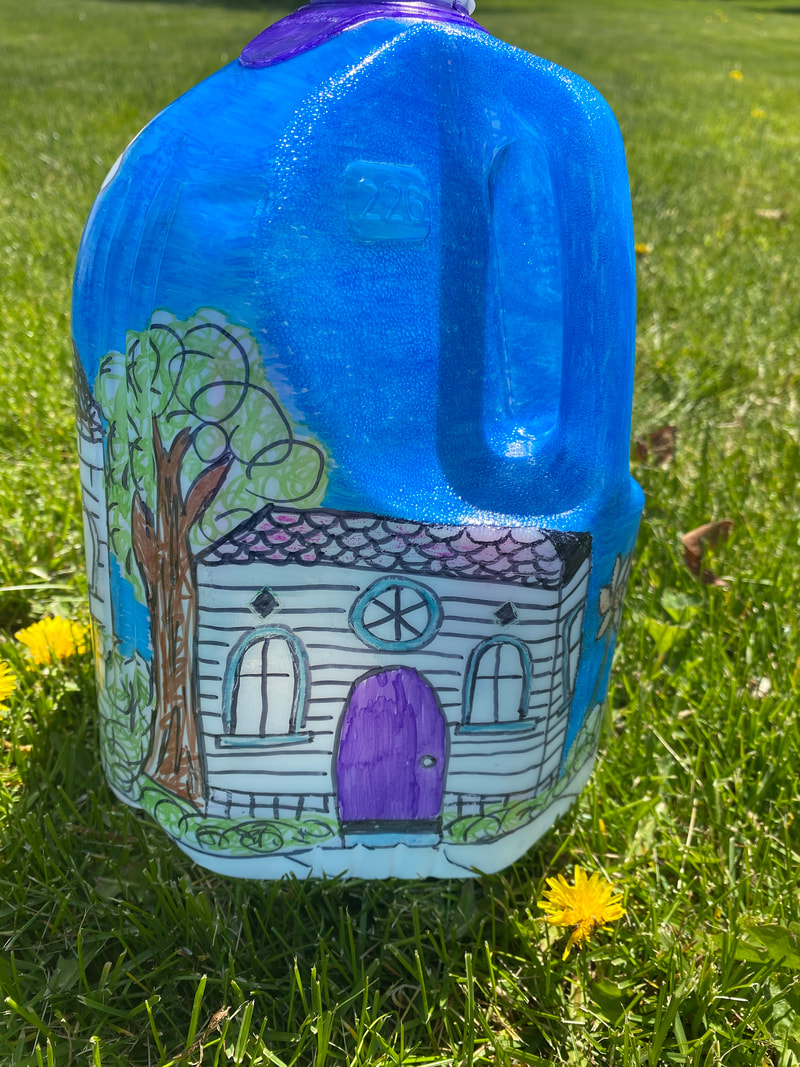
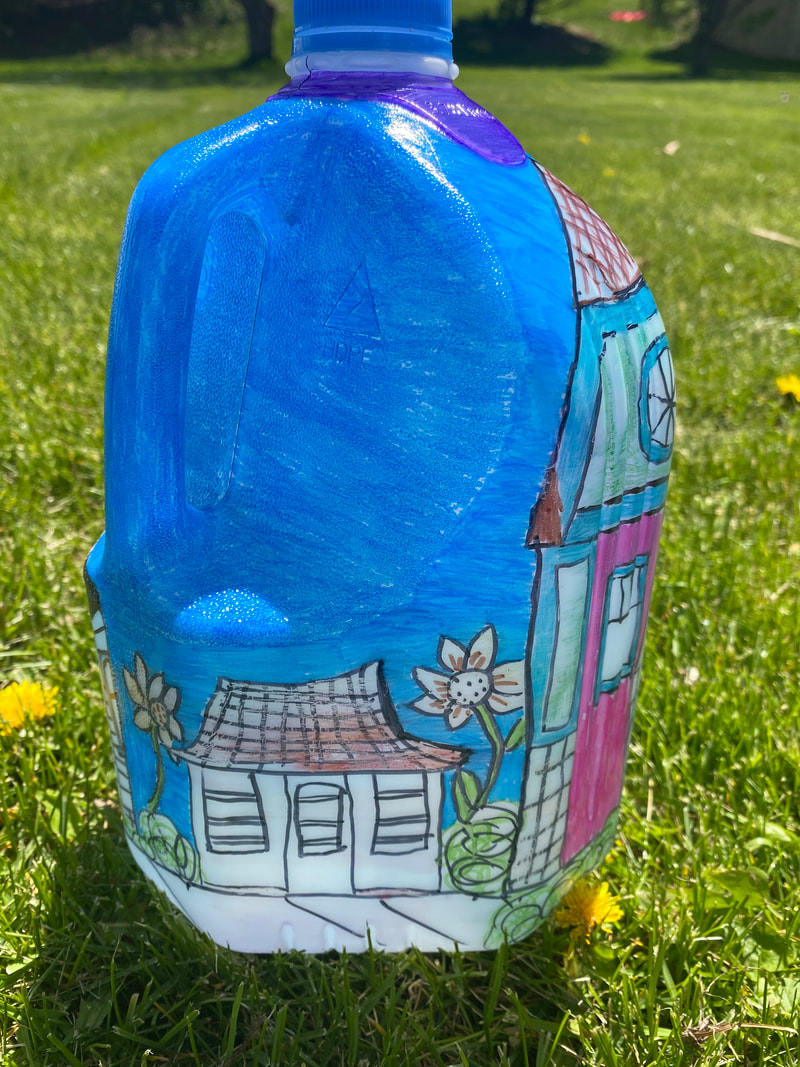
With creativity, there’s infinite potential in anything. An item can have many uses beyond its original purpose just like how a person moves at a different tempo and has unique goals and dreams at every phase of life. Seeing the circularity and potential for change in an object reminds me of humanity’s capability to reimagine and reconfigure its future. Reduce, reuse, upcycle! 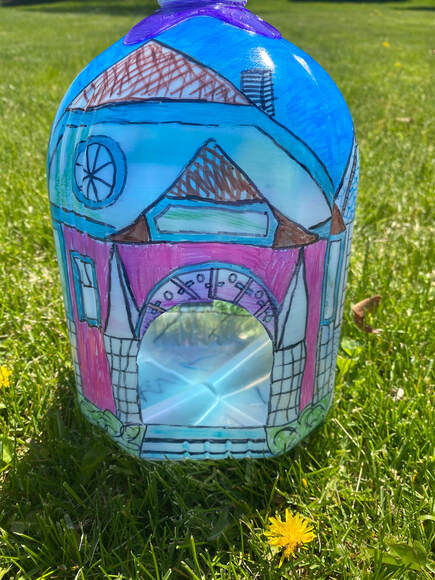 When refrigerated properly, milk has a shelf life of just a few weeks. We quickly consume the servings in a bottle and it’s on to the next one. It’s a different story for the durable #2 high-density polyethylene container that milk is stored in. Even if a plastic item is recycled, a lot of energy and resources are required to sort, sanitize, and break it down into a reusable form such as pellets. Many of the plastic items that we put in our recycling bins are ultimately disposed of. It can take up to 1,000 years for a #2 plastic item to fully decompose in a landfill. When plastics break down in waterways and oceans, the ecosystem becomes polluted with microplastics that are harmful to wildlife and people. Instead of burdening recycling facilities or possibly adding waste to a landfill, tap into your creativity to upcycle #2 plastic. Make a milk container mansion to welcome back your feathered friends this spring. They’ll enjoy living in sustainable luxury. Nest sold separately! To create this project, you’ll need:
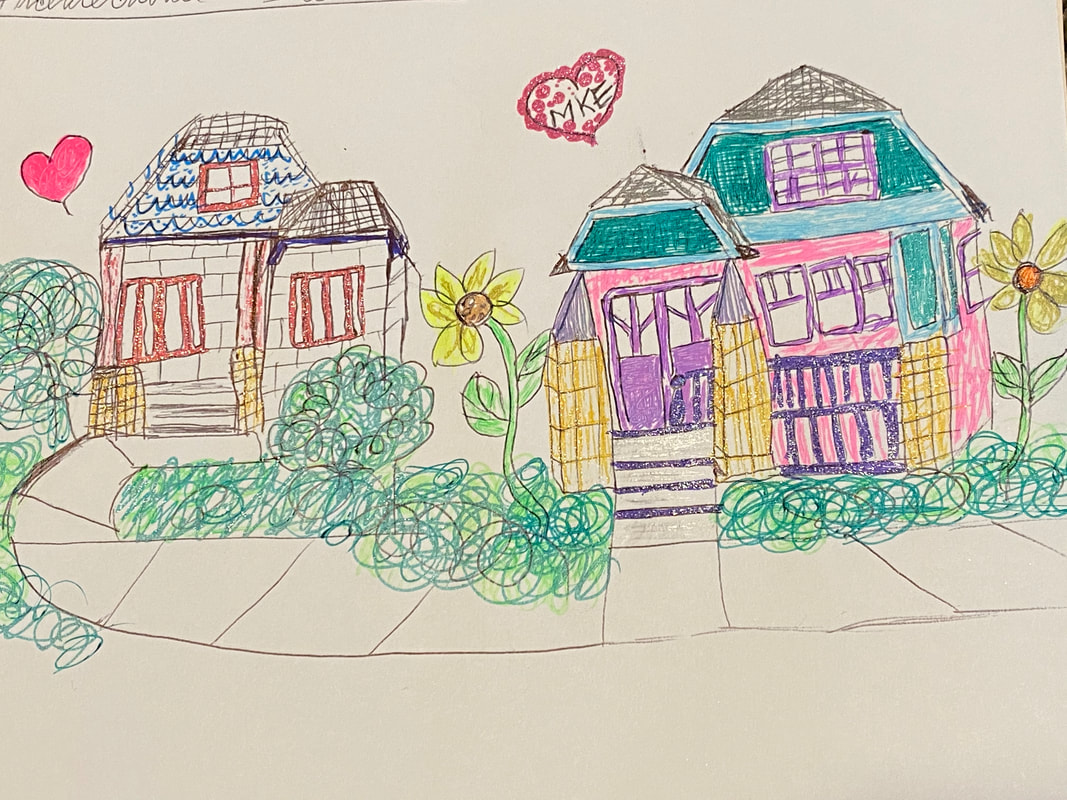
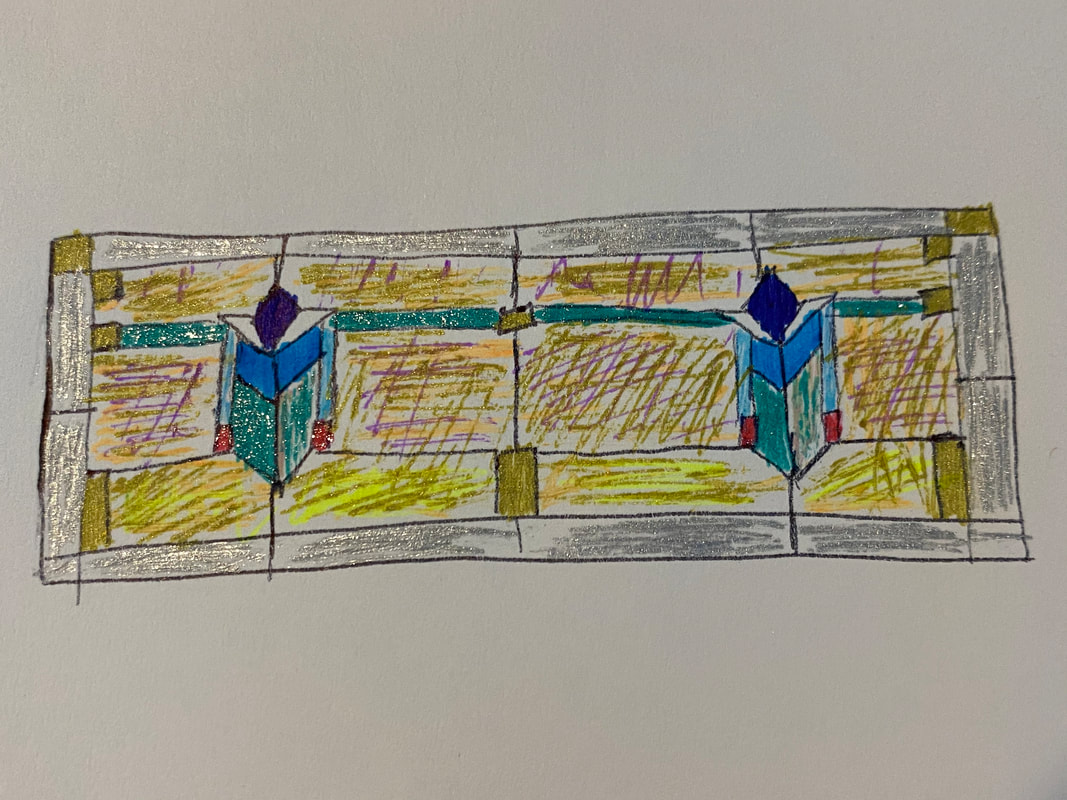
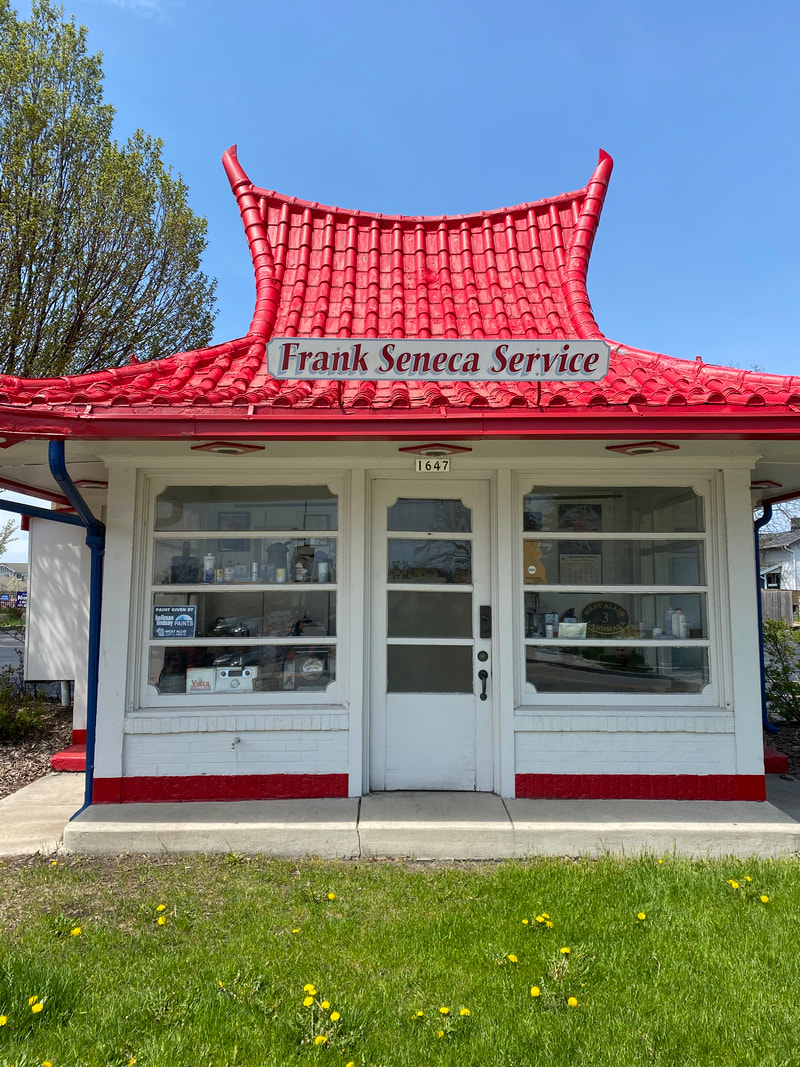
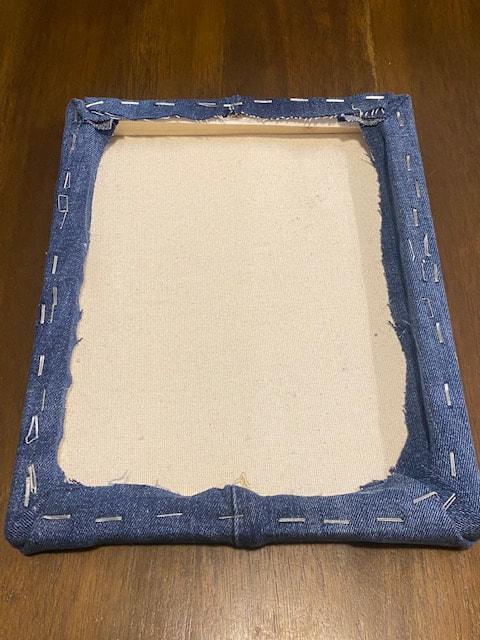
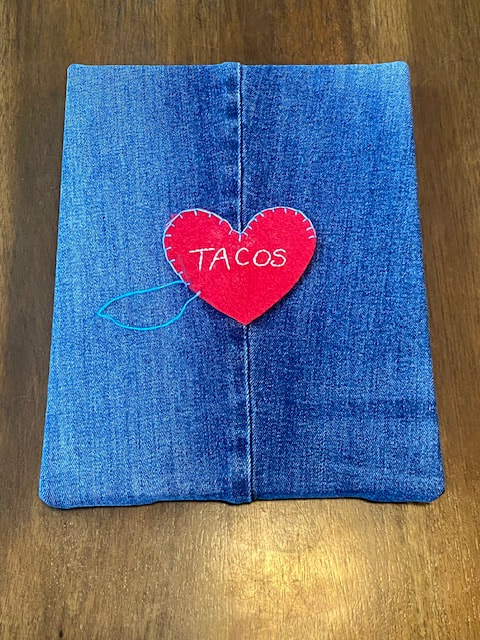
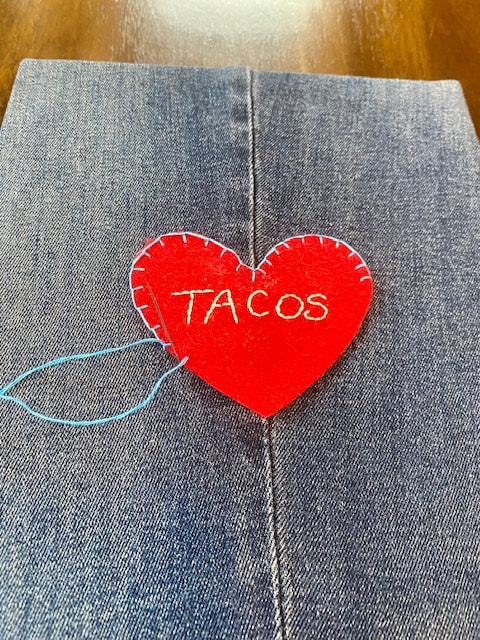
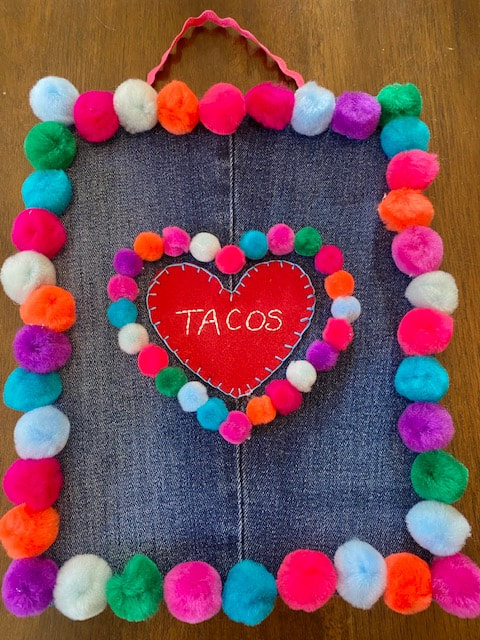
1. Begin by sanitizing the empty milk container with a spray of all-purpose cleaner with bleach and hot water. Peel the label off the container with Goo Gone Adhesive Remover. Be sure to save the bottle’s cap so the resident bird family has a watertight roof! 2. Make an entryway for the birds by poking a hole into one of the jug’s indentations. Use a pair of scissors to cut out more plastic to form a door. 3. Decorate the container with Sharpie permanent markers. The quintessential bungalow homes of Milwaukee inspired me to design this project. I’m fascinated by their charming stained-glass windows, built-in cabinets, gable roofs, and brick exteriors. Let wherever you live inspire your design or choose your favorite places to visit! 4. After the marker has fully dried, paint the milk container with two coats of Sculpey Gloss Glaze for polymer clay to protect your design. Follow the instructions on the glaze container. Your birdhouse is move-in ready! Securely attach it somewhere outside by threading a piece of floral wire through the container’s handle. Instead of wearing your heart on your sleeve, boldly declare your sentiments right on your front door! Destroy some denim you love to hate and gain a sweet Valentine’s Day sign! 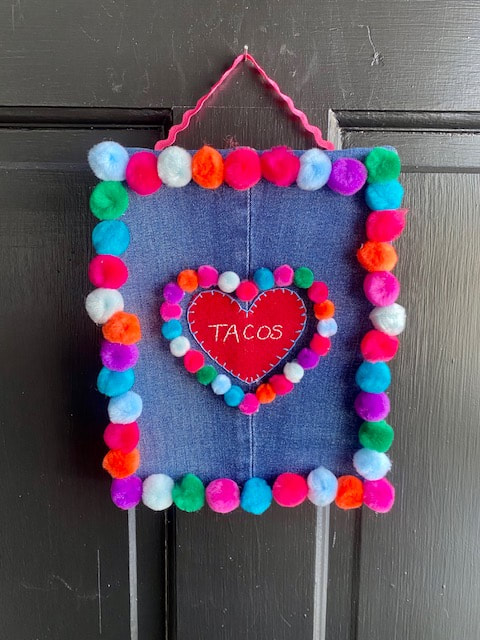 To make this project, you’ll need:
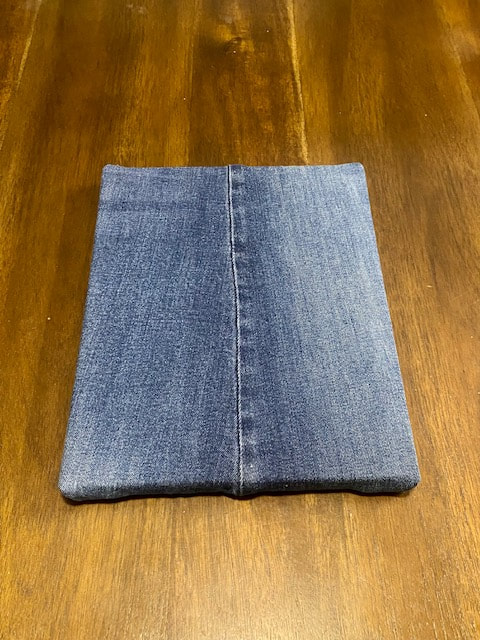
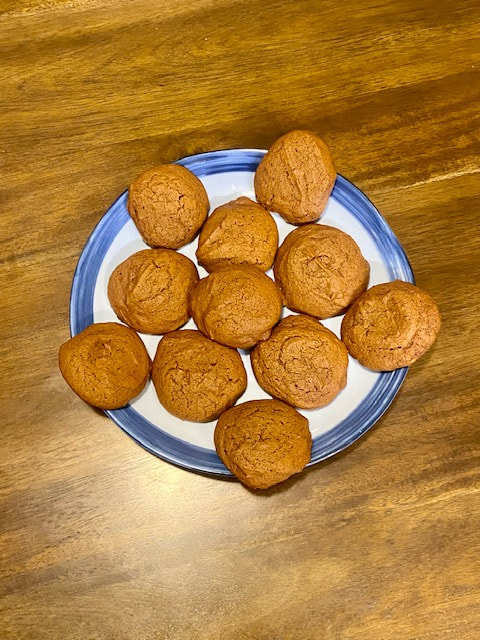
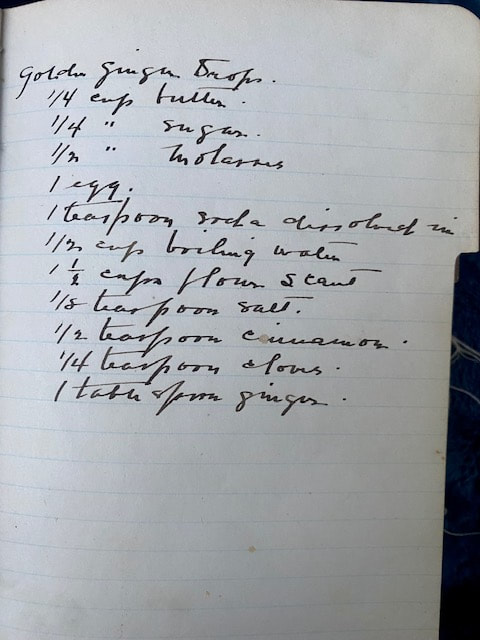
1. Iron the piece of denim you’ve chosen for this project. Stretch the fabric horizontally and vertically over the canvas, using a needle and thread to hold it taut from the back. Staple the denim to the reverse side of the canvas. 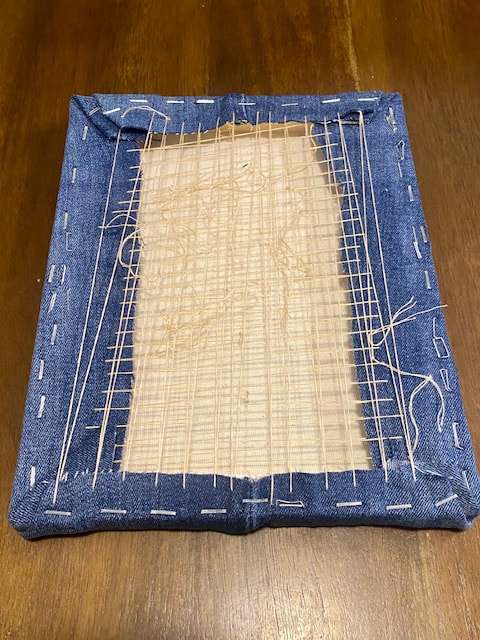 2. Cut and remove all the thread from the back of the canvas. Trim any excess denim. Then, use a hot glue gun to attach the denim to the frame. 3. Use the tracing template to outline a heart on the red felt. 4. Write a love message on the Magic Paper. Stick the Magic Paper inside the heart shape and put the felt in an embroidery hoop. Use three strands of DMC embroidery floss in white to sew the lettering with backstitching. 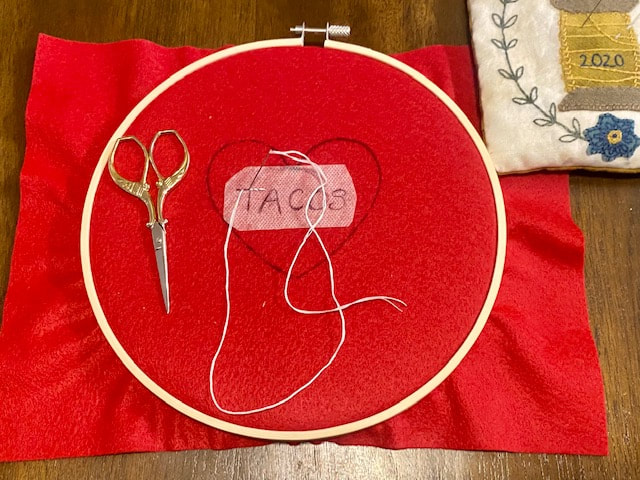 5. Remove the felt from the embroidery hoop. Soak the fabric in cold water to dissolve the Magic Paper. Let the fabric fully dry. Cut out the heart shape from the piece of felt. 6. Use three stands of DMC embroidery floss in #966 to appliqué the heart to the canvas with blanket stitch. 7. Glue small pompoms around the felt heart. 8. Glue medium sized pompoms along the edges of the canvas. 9. To create a hanger for the canvas, cut a 12-inch length of decorative trim and staple it to the upper corners of the reverse side of the canvas. Enjoy your new sign, Valentine! Warm up on even the coldest winter day with this retro cookie recipe. Golden ginger drops pack a punch with sugar, spice, and everything nice! To make this recipe, you’ll need: - ¼ cup butter - ¼ cup sugar - ½ cup molasses - One egg - 1 teaspoon baking soda dissolved in ½ cup boiling water - 1 ½ cups flour - ½ teaspoon salt - ½ teaspoon cinnamon - ¼ teaspoon cloves - 1 tablespoon ginger
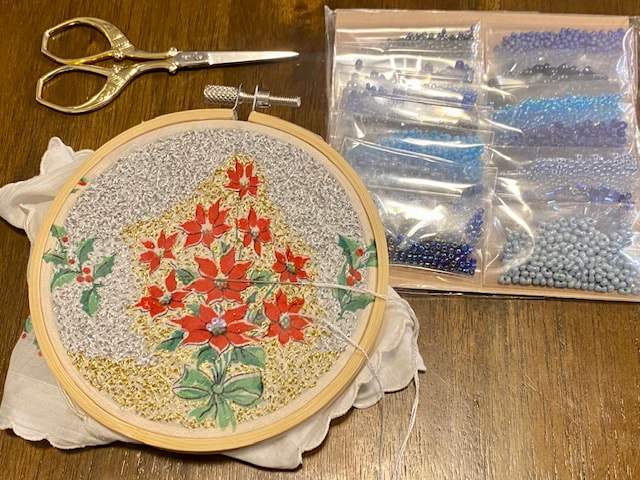
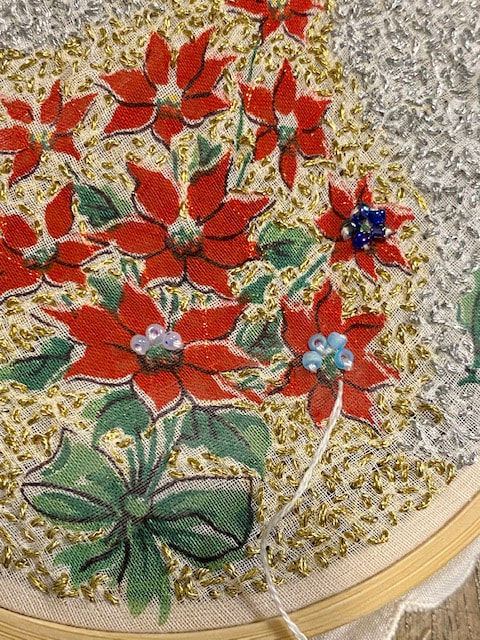
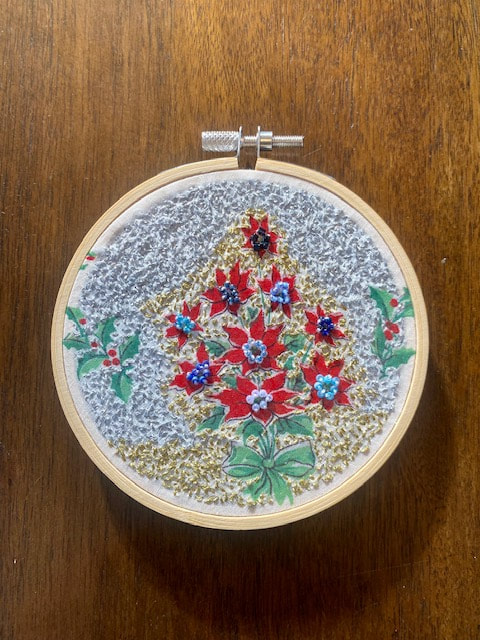
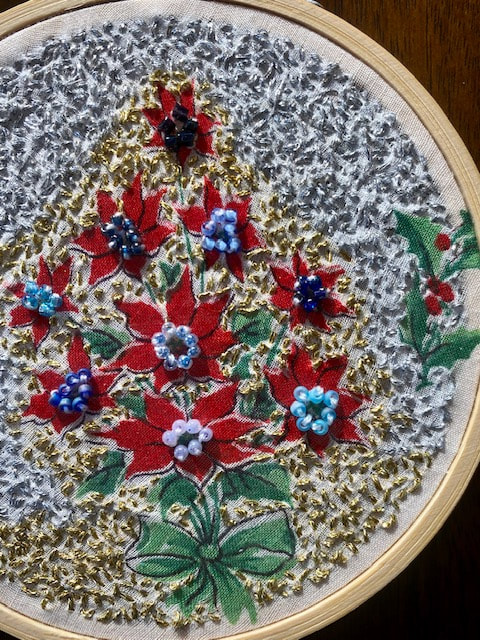
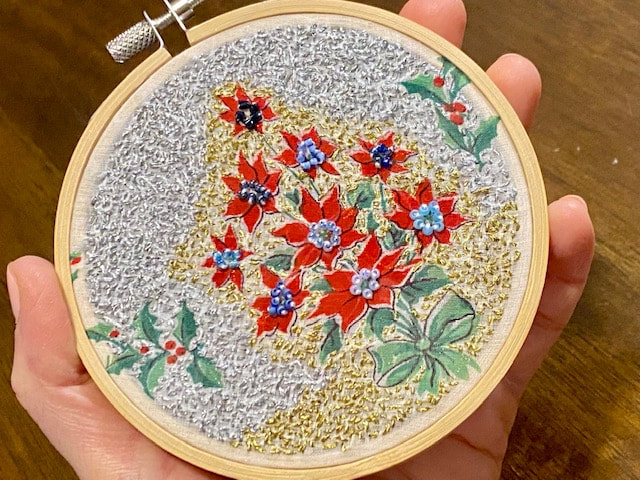
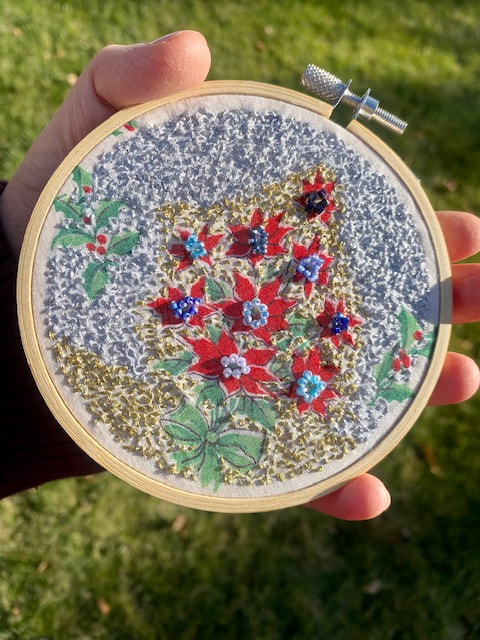
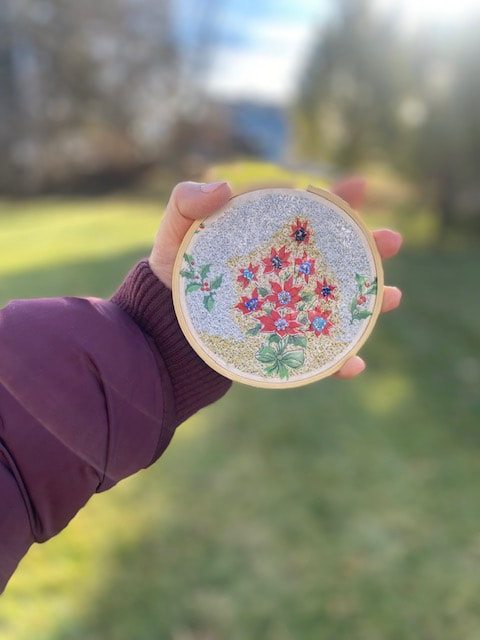
It’s cookie time! Before the holidays pass us by, make a little time for this DIY project. Elevate a vintage holiday handkerchief to wall art status with deceptively simple techniques, metallic thread, and a handful of shiny seed beads. To make this project, you’ll need:
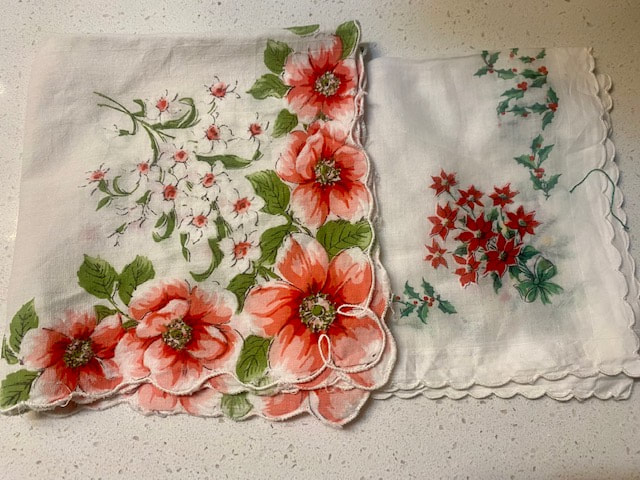 1. Iron all the fabric before you begin. Secure a pretty part of a hankie in the embroidery hoop. 2. Embellish the fabric with straight stitches made with metallic thread to add sparkle and contrast. 3. Sew on a sprinkling of seed beads for texture and dimension. 4. Trim the excess fabric and gather it behind the hoop. Cut a circle of white felt. Use the hot glue gun to secure the felt to the reverse side of the hankie. 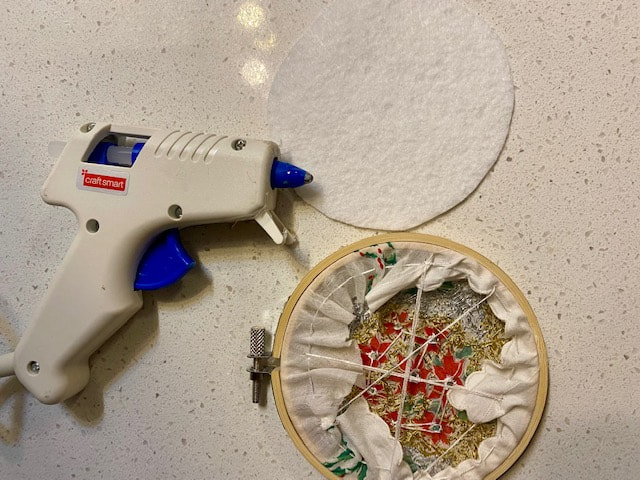 It’s time to deck the walls! Merry Christmas and happy holidays to all of you! |
Hello, there!
Thanks for visiting! Archives
February 2024
Categories |


 RSS Feed